
Robotics fascinates me because it is such an interdisciplinary technical field. Building robots means dealing with electrical engineering, mechanics, physics and software. In addition, every robot that interacts with its environment creates a kind of new, artificial life.
This article presents a generic robot controller consisting of the hardware, the corresponding driver software and a high-level application for controlling the robot over Wi-Fi (802.11). The project is aimed specifically at hobby robotics. An example robot that uses this controller can be found at the end of the article.
Overview
The proposed system architecture consists of three parts. Motors and sensors are controlled and read by the Low Level Controller, which is connected to a more powerful single-board computer (SBC) via a UART interface. The High Level Controller is responsible for video capture and voice output (TTS) as well as voice input (STT). In an autonomous system, all algorithms are executed here. If the system is to be remote-controlled by a user, the third component comes into play: the Remote Controller connects to the High Level Controller via Wi-Fi (802.11). Video and audio streams are sent via the Real-time Transport Protocol (RTP), while control commands and sensor data are exchanged via TCP/IP.

Hardware
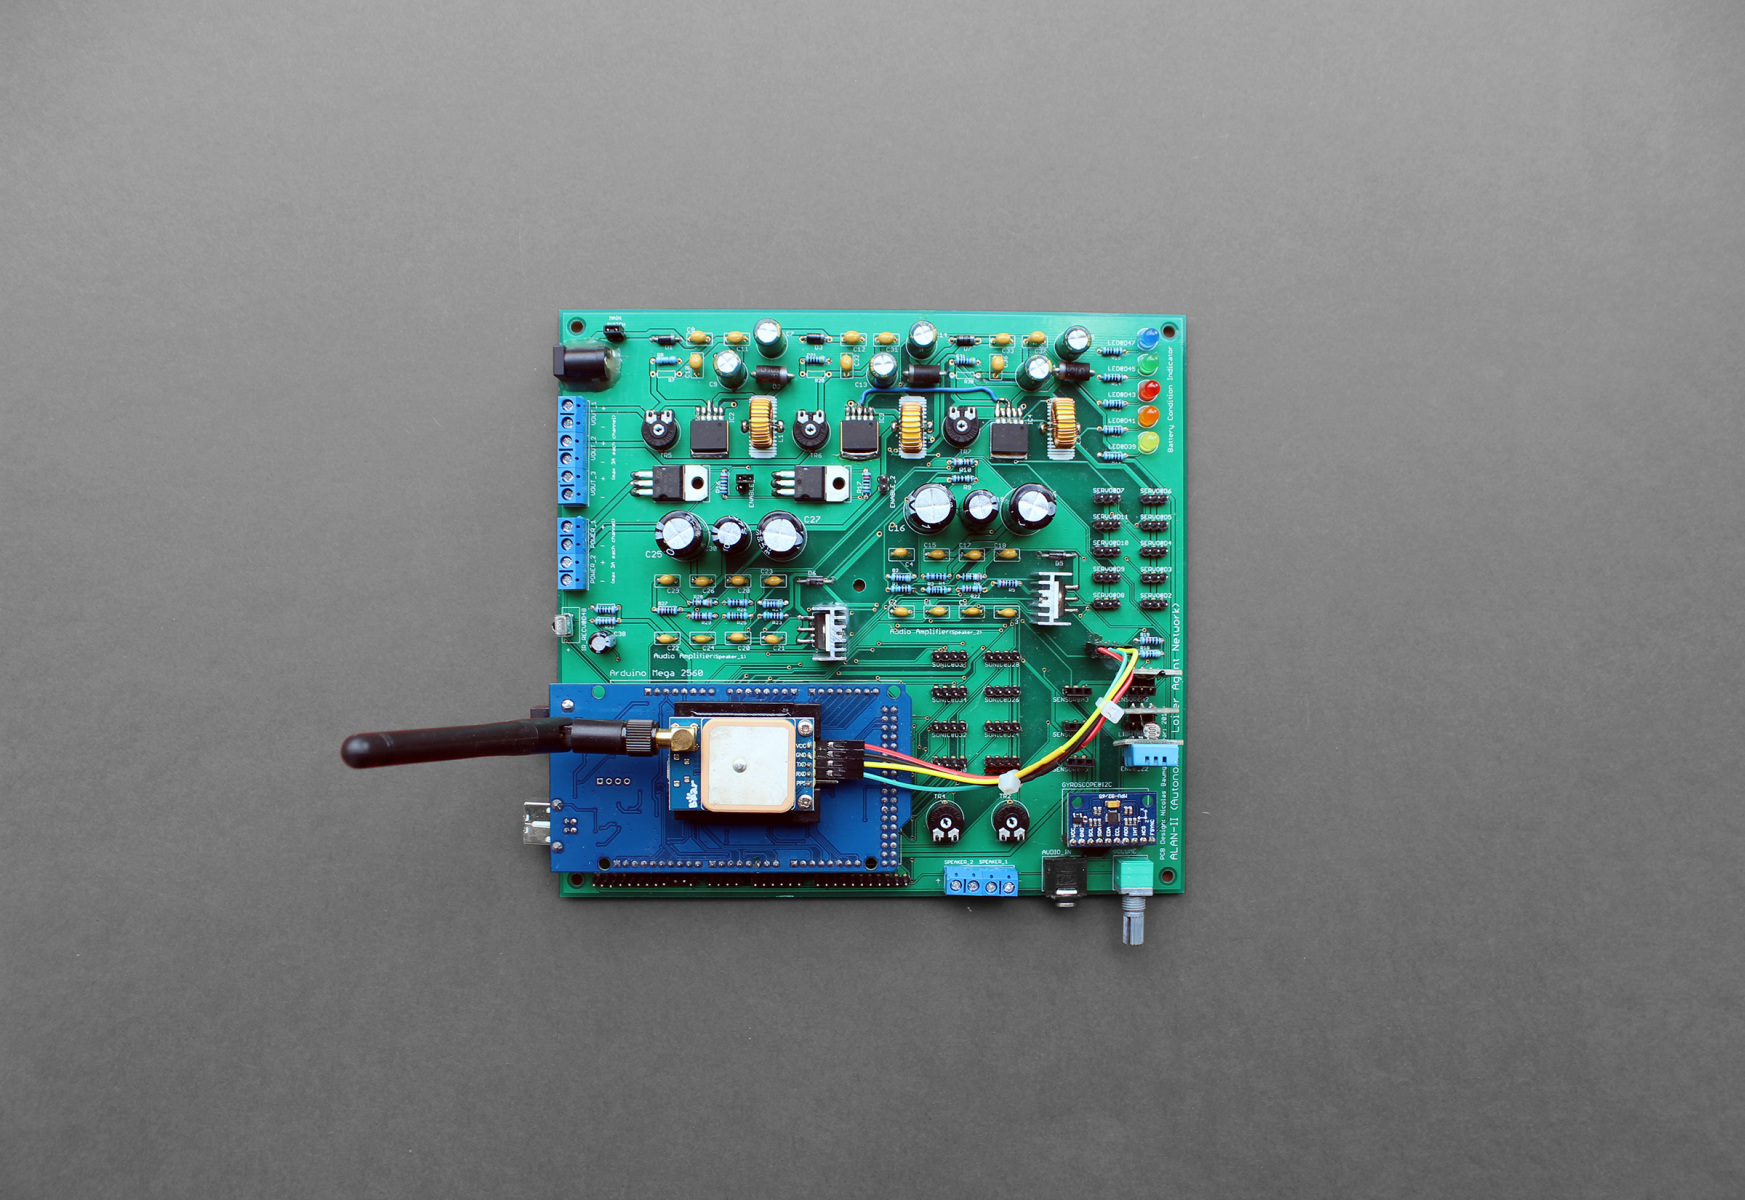
The prototype controller shown in the pictures below has the following features:
- ATmega 2560 Microcontroller (CPU 16 MHz, 8 kB SRAM, 54x GPIOs, 16x Analog Inputs, 4x UART, I2C, SPI)
- 3x DC/DC Buck Converter Step Down Modules (LM2596, max. 3 A each)
- 2x High Power Outputs Controlled by ATmega 2560, Adjustable Voltage (BD239, max. 3 A each)
- 1x Stereo Audio Amplifier (TDA2003, 12 V, 10 W)
- 12x Servo Motor Outputs
- 8x Proximity Sensor Inputs
- 6x Generic Sensor Inputs (Temperature, Humidity, Light, etc.)
- 5x Indicator LEDs
- 1x Gyroscope + Accelerometer
- 1x GPS Module
- 1x Infrared Receiver
- 1x Battery Voltage Meter
The current prototype is built using through-hole technology (THT); the final revision will use surface-mount devices (SMD) to achieve a smaller form factor.
Software
The software of the system presented here is divided into three parts. This section focuses on the Remote Controller application. The agent itself, consisting of the Low Level Controller and the High Level Controller, periodically broadcasts UDP beacon datagrams containing its dynamically assigned IP address and a fixed port number. Provided that the Remote Controller computer is connected to the same subnet, these UDP beacon datagrams let the Remote Controller detect agents automatically by decoding the agent’s IP address from the packets. As soon as a robot is found, a bidirectional TCP/IP connection is established for receiving sensor data from the agent and sending commands to it. In parallel, a second, unidirectional connection is established to transmit real-time video data from the agent to the user.
The screenshots in the gallery below illustrate the functionality of the Remote Controller application. The General tab mostly shows network-related statistics, such as round-trip times, which measure how long a packet takes to travel from the Remote Controller -> High Level Controller -> Low Level Controller and back again. These packets are also used to check the health of all communication links across the entire system. If any link goes offline, motors and other critical or dangerous parts of the system are shut down immediately.
The System tab gives an overview of all installed system components, such as CPU, GPU, RAM, disk drives, sensors and actuators, as well as the network and battery status. This panel is also used for adding new sensors and actuators. Components can be configured by double-clicking on them (see the screenshots for details).
The Console tab shows the debug output of the High Level Controller and Low Level Controller, which is redirected to the Remote Controller. On the next tab, GPS data is visualised on a map. The Camera tab shows the real-time video streams of the installed cameras. Video resolution and encoding quality can be configured.
The Servo tabs, mostly named after their function, let you experiment with the motors, controlled either with the mouse or with a joystick or gamepad. Servos first need to be configured with their respective minimum and maximum PWM widths. The Servo Action Library window can then be used to design entire movement sequences. These sequences can be bundled into Servo Actions, which can then be triggered when certain conditions are met (e.g. a sensor threshold or a voice command). Finally, an integrated Speech Synthesizer converts text to speech, which can likewise be triggered by any automatic or user-defined condition.

Usage Example
In this section, I proudly present a replica of the famous Hollywood robot Wall-E, built by a good friend of mine, Steven from www.roboterbau.ch. The Multipurpose Robot Controller perfectly meets the requirements for controlling Wall-E.

The following videos show some of Wall-E’s functions.


